WARNING!- If You don’t have suffcient mechanical knowledge, experience and proper tools, we strongly recommend, that You have these operations done by Your selling dealer or at Your local motorcycle service center! Making mistake during the disassembly or assembly of the electric system will void the warranty and may cause a hazardous situation, resulting in fire, severe injury or death and damage to property.
- For safety reasons it is strongly recommended to leave the battery discharged before handling any component of the motorcycle's electrical system!
- Do not let the battery to stay fully discharged for longer than neccessary, as it may have a negative impact on its capacity. Charge the battery after each ride.
NOTE:- All our motorcycles with Li-Ion batteries have the battery disconnected for shipping. Connect the main power connectors before turning the motorcycle ON.
- 36V Li-Ion battery requires the charger to be plugged in and charged up before the first ride for the BMS (battery management system) to exit the deep sleep state.
Table of contents:- Faulty controller setup
- Disconnected wiring/faulty fuse
- Faulty kill switch
- Faulty accelerator
- Faulty charger, charge port or battery
- Aborted firmware update
1. Faulty controller setup
Follow these steps to perform a controller factory reset:
- Push and hold the Torque & Speed (Mode) control button.
- Turn the motorcycle kill switch ON (magnet attached).
- All 3 LEDs on the accelerator will flash for the 1st time, for the 2nd time, for the 3rd time and after 5 seconds they will start flashing rapidly.
- Twist the accelerator to its maximum and hold it in this position.
- Release the Torque & Speed control button - the LEDs will stop flashing.
- Wait, until the LEDs will light up without flashing, then release the accelerator.
- Turn the motorcycle kill switch OFF (magnet not attached).
2. Disconnected wiring/faulty fuse
NOTE:
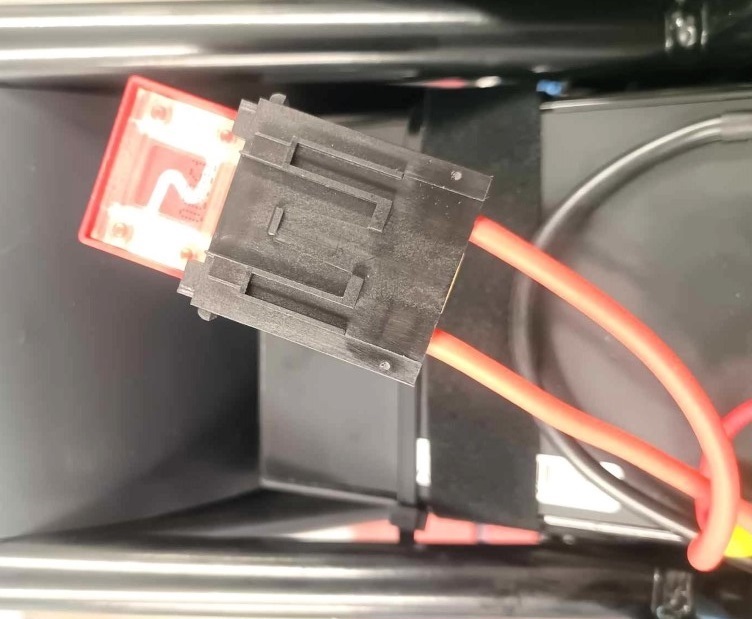
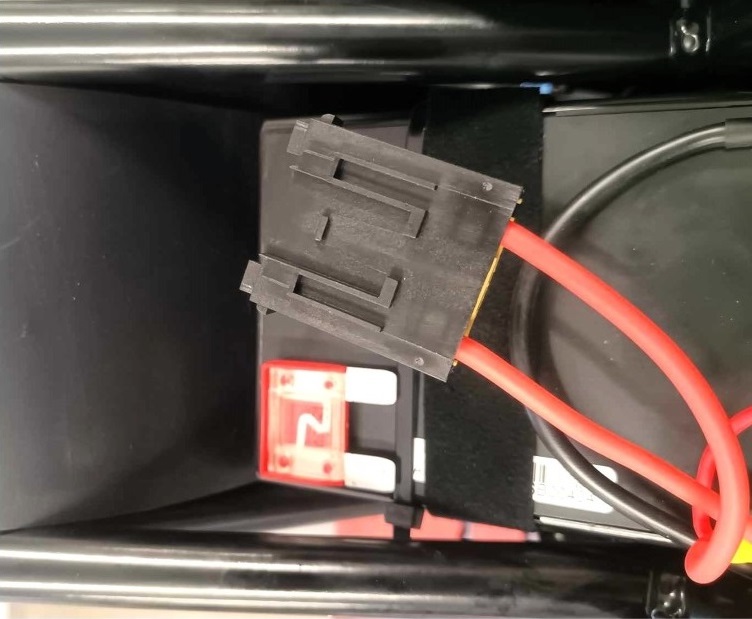
Lead-Acid versions comes with all the wirings connected, while Li-Ion versions have the battery disconnected for shipping. Connect the 2 main red power connectors, that are visible above the motor, and pull them behind the plastic mud cover.
Follow these steps to check all connections:
Required tools: - hex wrench #6
- Torx wrench #T25
- brush
- technical alcohol
- compressed air source with moisture separator
- Make sure, that the magnetic kill switch is in OFF position (magnet NOT attached) and the battery state of charge is very low.
- Place the motorcycle on a solid and level surface of a mounting stand, so that both wheels are on the ground.
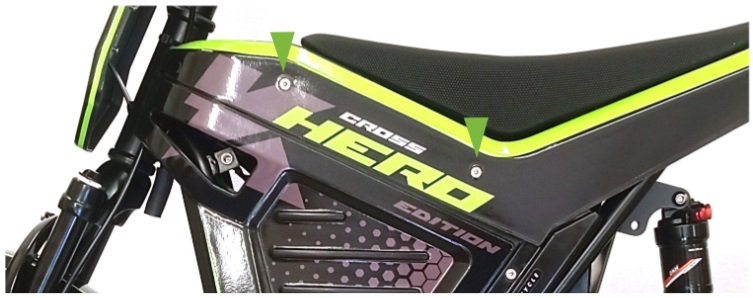
- (Only for Cross): Using the hex wrench #6 loosen and remove the underseat bolt, located on the underside of the upper plastic bodywork (above the rear wheel), slide the seat forward and remove it from the motorcycle.
- Using the Torx wrench #T25 loosen and remove the upper 4 bolts from the upper plastic bodywork (2 on the left side + 2 on the right side).
.jpg)
- Remove the upper plastic bodywork by gentle pull up.
- Using the Torx wrench #T25 loosen and remove the 4 additional bolts from the left and right plastic bodywork (2 on the left side + 2 on the right side) and with a light frame tilt on the mounting stand remove both plastic bodyworks.
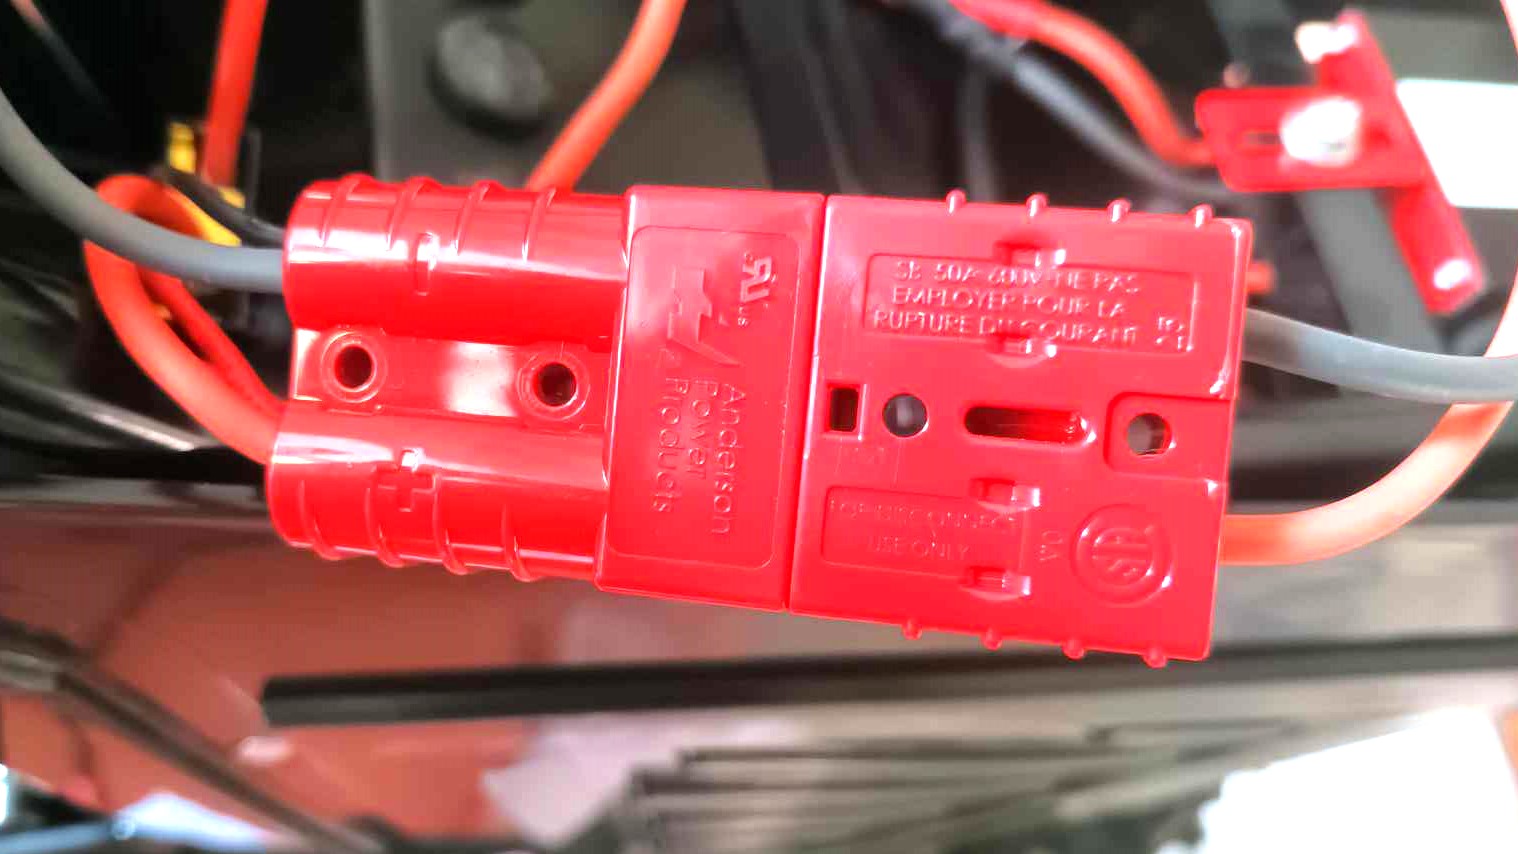
- Remove the main red fuse (50A slow blow) from its socket.
- (Only for Lead-Acid battery): Check, whether the 2 cables, leading to the lower battery, have red and black ends (some older models did not have it). If not, use red insulating tape to mark the end of the cable, that leads to the positive pole of the battery, and use black insulating tape to mark the end of the cable, that leads to the negative pole of the battery. Repeat the same with the 2 upper batteries.
- Check all the connectors and the fuse for any damage, debris, oxidation or loose connection. Disconnect and clean all the connectors if necessary. Please, see the wiring schemes below and double check, that the wiring is correct (primarily for second-hand motorcycles).
- Reinstall the red fuse, removed in step #7, into its socket. A short and audible spark may appear during closing the circuit.
- With a light frame tilt on the mounting stand reinstall the left plastic bodywork and using the Torx wrench #T25 install and tighten the 2 lower bolts (5 - 6 Nm).
- Repeat the same step with the right plastic bodywork.
- Reinstall the upper plastic bodywork, align its 2 left holes with the holes on the frame and on the left side bodywork, reinstall 2 bolts and using the Torx wrench #T25 tighten them (5 - 6 Nm).
- Repeat the same step on the right side.
- (Only for Cross): Install the seat by sliding it backward on the bolt, located close to the Torque & Speed control button, and align the hole in the seat and the upper plastic bodywork with its corresponding hole on the frame just above the rear wheel.
- (Only for Cross): Install the seat bolt, removed in step #3, and tighten it using the hex wrench #6 (18 - 20 Nm).
- Double check, that all bolts and nuts are properly tightened.
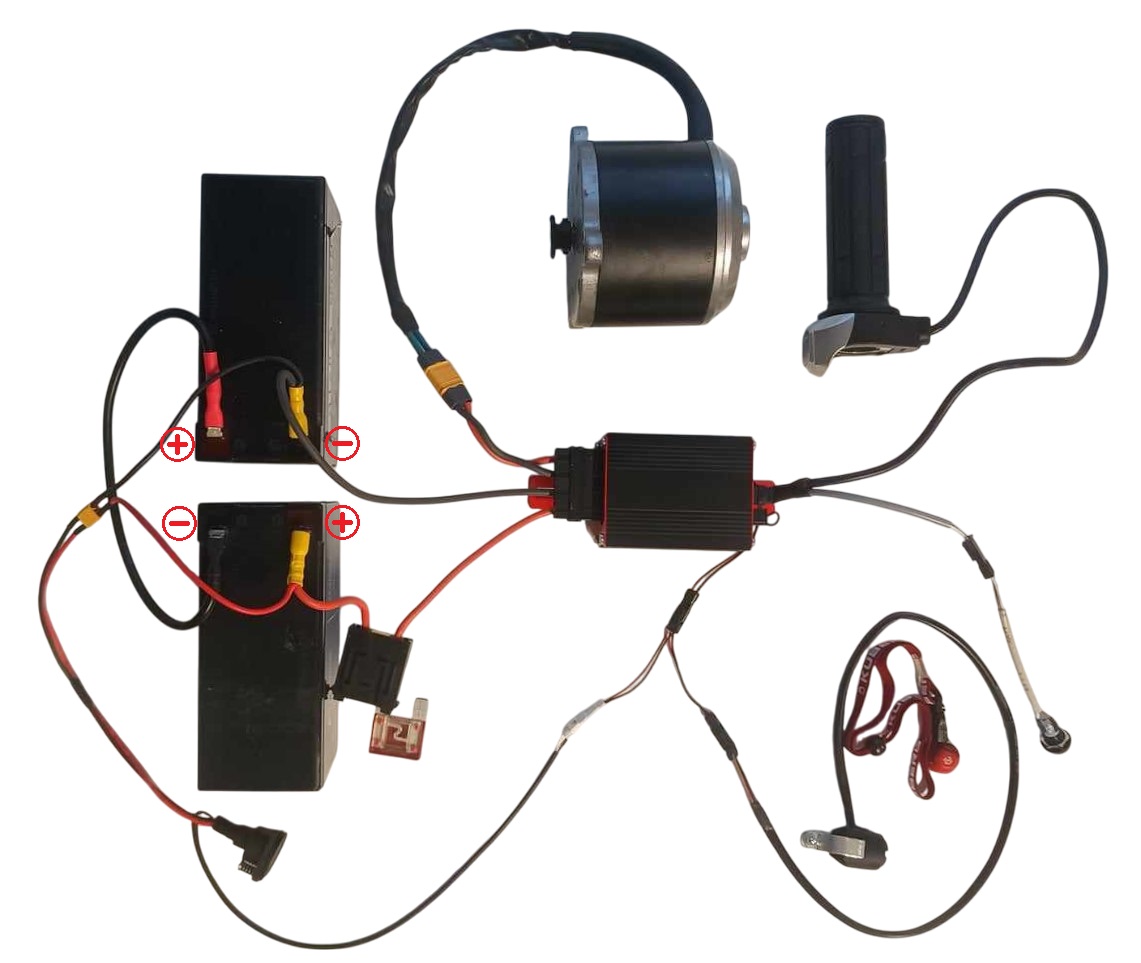
Trial/Cross MY2021-2023 wiring scheme:
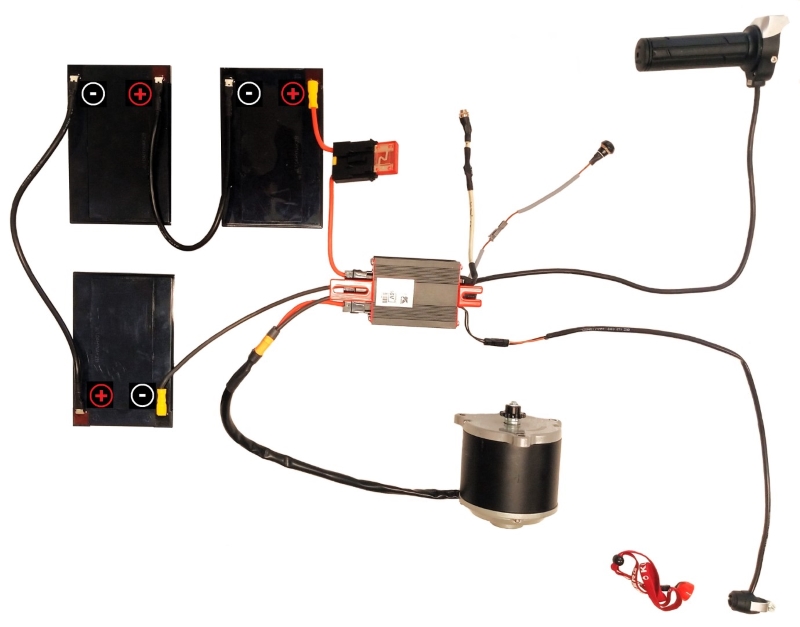
Trial/Cross MY2024 and newer wiring scheme:
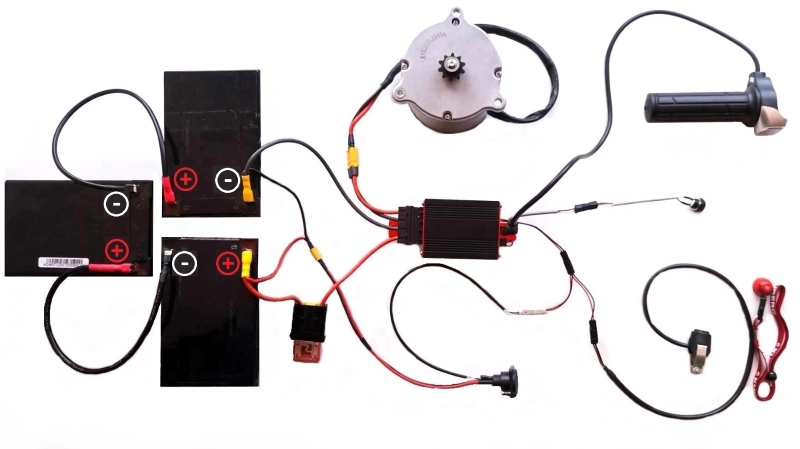
Start MY2023 and older wiring scheme:
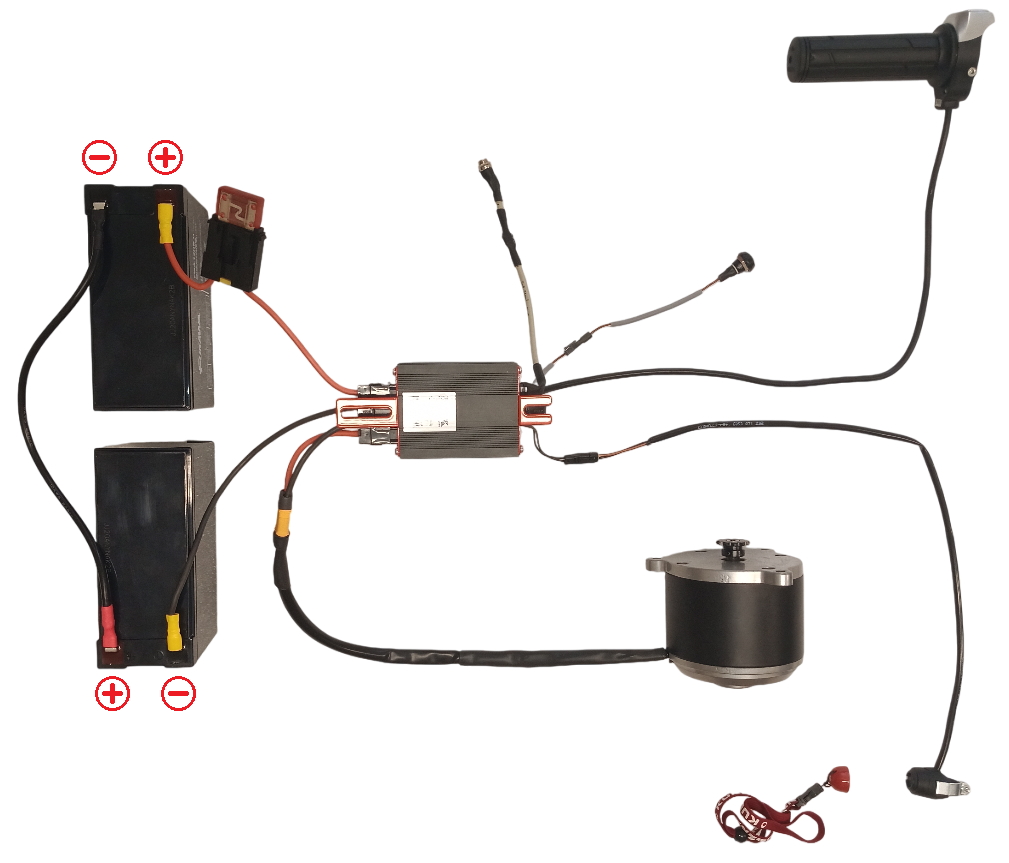
Start MY2024 and newer wiring scheme:
3. Faulty kill switch
Follow these steps to check the kill switch function:
Required tools: - hex wrench #6
- Torx wrench #T25
- multimeter
- Make sure, that the magnetic kill switch is in OFF position (magnet NOT attached) and the battery state of charge is very low.
- Place the motorcycle on a solid and level surface of a mounting stand, so that both wheels are on the ground.
- (Only for Cross): Using the hex wrench #6 loosen and remove the underseat bolt, located on the underside of the upper plastic bodywork (above the rear wheel), slide the seat forward and remove it from the motorcycle.
- Using the Torx wrench #T25 loosen and remove the upper 4 bolts from the upper plastic bodywork (2 on the left side + 2 on the right side).
.jpg)
- Remove the upper plastic bodywork by gentle pull up.
- Using the Torx wrench #T25 loosen and remove the 4 additional bolts from the left and right plastic bodywork (2 on the left side + 2 on the right side) and with a light frame tilt on the mounting stand remove both plastic bodyworks.
- Disconnect the kill switch and use a multimeter with the circuit check function on its inner connector. The correct function is:
Magnet attached = open circuit
Magnet not attached = closed circuit - Try to start the motorcycle without the kill switch connected. If the motorcycle starts to work, replace the kill switch.
Follow these steps to reassemble the motorcycle:
- With a light frame tilt on the mounting stand reinstall the left plastic bodywork and using the Torx wrench #T25 install and tighten the 2 lower bolts (5 - 6 Nm).
- Repeat the same step with the right plastic bodywork.
- Reinstall the upper plastic bodywork, align its 2 left holes with the holes on the frame and on the left side bodywork, reinstall 2 bolts and using the Torx wrench #T25 tighten them (5 - 6 Nm).
- Repeat the same step on the right side.
- (Only for Cross): Install the seat by sliding it backward on the bolt, located close to the Torque & Speed control button, and align the hole in the seat and the upper plastic bodywork with its corresponding hole on the frame just above the rear wheel.
- (Only for Cross): Install the seat bolt, removed in step #3, and tighten it using the hex wrench #6 (18 - 20 Nm).
- Double check, that all bolts and nuts are properly tightened.
4. Faulty accelerator
Follow these steps to check the accelerator function:
- Check, whether the accelerator rotates freely and is not stuck in one position.
- Check, whether there's no water, mud or other debris on the accelerator.
5. Faulty charger, charge port or battery
Follow these steps to check the function of each part:
Required tools: - hex wrench #6
- Torx wrench #T25
- multimeter
- Ensure, that the magnetic kill switch is in OFF position (magnet NOT attached).
- Place the motorcycle on a solid and level surface of a mounting stand, so that both wheels are on the ground.
- Connect the charger to an electrical outlet. The LED on the charger will glow blue (Lead-Acid battery charger) or green (Li-Ion battery charger). If the charger have no visible LED indication, even if it has a LED, then it is probably faulty.
- Use a multimeter to measure the charger output voltage – it should be approx. 44.5 V for Lead-Acid battery charger and approx. 42 V for Li-Ion battery charger. If the charger has very different output voltage (difference greater than 1.5 V), or the output voltage is measurable only when its connector is in specific position, the charger or its connector may be faulty.
- Connect the charger to the charge port on the motorcycle. The LED on the charger will glow red (Lead-Acid battery charger) or yellow (Li-Ion battery charger). If the LED colour does NOT change after connecting, the charge port may be either disconnected from the battery, or it may be faulty (see below).
- Charge the battery to 100%, then disconnect the charger from the motorcycle and note the current time. When charging is finished, the LED on the charger will glow green. If the charging process will not finish even after 12 hours, the charger or battery may be faulty.
Follow these steps to uncover the motorcycle battery and charge port:
- (Only for Cross): Using the hex wrench #6 loosen and remove the underseat bolt, located on the underside of the upper plastic bodywork (above the rear wheel), slide the seat forward and remove it from the motorcycle.
- Using the Torx wrench #T25 loosen and remove the upper 4 bolts from the upper plastic bodywork (2 on the left side + 2 on the right side).
- Remove the upper plastic bodywork by gentle pull up.
- Using the Torx wrench #T25 loosen and remove the 4 additional bolts from the left and right plastic bodywork (2 on the left side + 2 on the right side) and with a light frame tilt on the mounting stand remove both plastic bodyworks.
NOTE:
The Lead-Acid battery in Start consists of 2 batteries, each with 12 V nominal voltage (above 14 V fully charged), connected in series. The Lead-Acid battery in Trial/Cross consists of 3 batteries, each with 12 V nominal voltage (above 14 V fully charged), connected in series. The Li-Ion battery consists of 1 battery, enclosed in a metal box. Every KUBERG battery for Start/Trial/Cross has a rubber surface from below to prevent abrasion between the frame and a battery and to minimize the risk of formatting an impact cracks.
- Wait 1 hour from the moment of disconnecting the charger from the motorcycle, then measure the DC voltage of the battery:
(Only for Lead-Acid version): Do NOT disconnect any cable and measure the voltage directly on each battery. If the voltage is below 12 V, consider battery exchange. Optionally You can use a charger with recovery mode to charge each battery separately. When changing batteries, do NOT mix old batteries with new ones! (see knowledgebase article "Battery removal and installation")
(Only for Li-Ion version): Disconnect the main red battery connectors and measure the battery voltage directly on battery poles. If the voltage is below 34 V, consider battery exchange. (see knowledgebase article "Battery removal and installation")
- Disconnect the charge port and clean it properly with technical alcohol and pressurized air.
NOTE:
Start/Trial/Cross (MY2023 and older) had a switch included in the charge port. If the charger is plugged in, the inner switch is disconnected and the motorcycle is unable to turn ON using the kill switch. If the charger is NOT plugged in, the inner switch is connected, so the motorcycle can be turned ON by the kill switch. If this switch is damaged, the charger is unable to charge the battery, or the motorcycle can NOT be turned ON, or both. The switch function can be temporarily disabled and bypassed by connecting the 2 cables mentioned below.
- (Only for Start/Trial/Cross MY2023 and older): Disconnect the charger from the electrical outlet and keep it this way for the next step.
- (Only for Start/Trial/Cross MY2023 and older): Use a multimeter with the circuit check function. The correct function of the charge port is:
Without the charger connected to the charge port: middle and right pin on the output connector = open circuit
With the charger connected to the charge port: middle and right pin on the output connector = closed circuit
Reinstall the charge port when finished.
Follow these steps to reassemble the motorcycle:
- With a light frame tilt on the mounting stand reinstall the left plastic bodywork and using the Torx wrench #T25 install and tighten the 2 lower bolts (5 - 6 Nm).
- Repeat the same step with the right plastic bodywork.
- Reinstall the upper plastic bodywork, align its 2 left holes with the holes on the frame and on the left side bodywork, reinstall 2 bolts and using the Torx wrench #T25 tighten them (5 - 6 Nm).
- Repeat the same step on the right side.
- (Only for Cross): Install the seat by sliding it backward on the bolt, located close to the Torque & Speed control button, and align the hole in the seat and the upper plastic bodywork with its corresponding hole on the frame just above the rear wheel.
- (Only for Cross): Install the seat bolt and tighten it using the hex wrench #6 (18 - 20 Nm).
- Double check, that all bolts and nuts are properly tightened.
6. Aborted firmware update
Follow these steps to repeat the firmware update:
- Applies only for motorcycles equiped with wi-fi adapter (sold separately) - try to upload the firmware again.
- Detach the magnet from the kill switch and wait 1 minute, then attach the magnet again.
If Your motorcycle is under warranty, please register it on our website, if You have not already done so:
https://www.kuberg.com/en/bike-registration
If the problem persists, please contact Your dealer or KUBERG customer service (support@kuberg.com). For the fastest possible resolution please send: - VIN of Your motorcycle (it is stamped on the right side of the steering column).
- Detailed information on actions taken so far, a few photos and preferably a video.